
本文转载自微信公众号「Android开发编程」,作者Android开发编程。转载本文请联系Android开发编程公众号。
前言
LiveData 是一种可观察的数据存储器类。与常规的可观察类不同,LiveData 具有生命周期感知能力,意指它遵循其他应用组件(如 Activity、Fragment 或 Service)的生命周期。
这种感知能力可确保 LiveData 仅更新处于活跃生命周期状态的应用组件观察者。
LiveData本身是观察者,观察组件的Lifecycle,也是被观察者,数据变化时要通知数据的观察者。
前面我们讲解了Lifecycle实现原理,今天我们来看LiveData
源码进阶之lifecycle组件原理分析
一、livedata的在app中的应用
1、使用livedata的步骤
- 创建一个实例LiveData来保存某种类型的数据。这通常在你的ViewModel类内完成;
- 创建一个Observer 定义onChanged()方法的对象,该对象 控制LiveData对象保存的数据更改时发生的情况。您通常Observer在UI控制器中创建对象,例如activity或fragment;
- 使用该 方法将Observer对象附加到对象。该方法需要一个对象。这将对象订阅到对象,以便通知其更改。您通常将该对象附加到UI控制器中,例如活动或片段;
2、livedata的简单例子
在viewModel中之定义live data
public class NameViewModel extends ViewModel {
// Create a LiveData with a String
private MutableLiveData<String> mCurrentName;
    public MutableLiveData<String> getCurrentName() {
        if (mCurrentName == null) {
            mCurrentName = new MutableLiveData<String>();
        }
        return mCurrentName;
    }
// Rest of the ViewModel...
}
- 1.
- 2.
- 3.
- 4.
- 5.
- 6.
- 7.
- 8.
- 9.
- 10.
- 11.
在activity或者Fragment中实施监听来更新ui
public class NameActivity extends AppCompatActivity {
    private NameViewModel mModel;
    @Override
    protected void onCreate(Bundle savedInstanceState) {
        super.onCreate(savedInstanceState);
        // Other code to setup the activity...
        // Get the ViewModel.
        mModel = ViewModelProviders.of(this).get(NameViewModel.class);
        // Create the observer which updates the UI.
        final Observer<String> nameObserver = new Observer<String>() {
            @Override
            public void onChanged(@Nullable final String newName) {
                // Update the UI, in this case, a TextView.
                mNameTextView.setText(newName);
                 //注意这里 在MVVM 中不是这样写的 这里只是单行绑定
            }
        };
        // Observe the LiveData, passing in this activity as the LifecycleOwner and the observer.
        mModel.getCurrentName().observe(this, nameObserver);
        //注意这个地方用没有用Java8的lambda表达式,可以写的更加简练,
    }
}
- 1.
- 2.
- 3.
- 4.
- 5.
- 6.
- 7.
- 8.
- 9.
- 10.
- 11.
- 12.
- 13.
- 14.
- 15.
- 16.
- 17.
- 18.
- 19.
- 20.
- 21.
- 22.
更新livedata对象
调用setValue(T)示例会导致观察者onChanged()使用该值调用其ui进行刷新。该示例示出了按钮按下,但setValue()还是postValue()可以被调用以更新mName为各种各样的原因,包括响应于网络请求或数据库负荷完成; 在所有情况下,呼叫setValue()或postValue()触发观察员并更新UI;
mButton.setOnClickListener(new OnClickListener() {
    @Override
    public void onClick(View v) {
        String anotherName = "John Doe";
        mModel.getCurrentName().setValue(anotherName);
    }
});
mButton.setOnClickListener(new OnClickListener() {
    @Override
    public void onClick(View v) {
        String anotherName = "John Doe";
        mModel.getCurrentName().setValue(anotherName);
    }
});
- 1.
- 2.
- 3.
- 4.
- 5.
- 6.
- 7.
- 8.
- 9.
- 10.
- 11.
- 12.
- 13.
- 14.
二、livedata原理详细分析
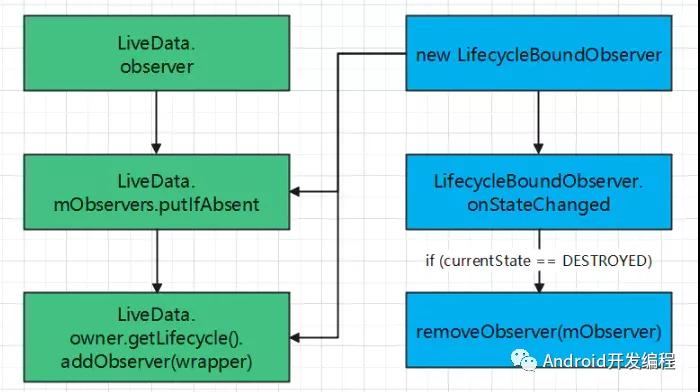
1、observe 方法
- 首先这个方法只能在主线程注册观察;
- 官方文档说LiveData仅处于活跃生命周期才有效,所以一开始就开始判断是否为 Lifecycle.Stete.DESTROYED,是的话就没有然后了,直接return;
- 接下来就是 创建 LifecycleBoundObserver ,生命周期变化逻辑在这里面;
- 然后就是最后一行注册观察,如果想了解 Lifecycle.addObserver 做了什么可以看 Android Lifecycle实现原理;
//map 的 key 为LiveData数据观察者,value为组件的Lifecycle观察者
    private SafeIterableMap<Observer<? super T>, ObserverWrapper> mObservers =
            new SafeIterableMap<>();
    @MainThread
    public void observe(@NonNull LifecycleOwner owner, @NonNull Observer<? super T> observer) {
        assertMainThread("observe");
        //判断当前生命周期的状态
        if (owner.getLifecycle().getCurrentState() == DESTROYED) {
            // ignore
            return;
        }
        //Lifecycle的生命周期变化逻辑在这里
        LifecycleBoundObserver wrapper = new LifecycleBoundObserver(owner, observer);
        //mObservers 保存
        ObserverWrapper existing = mObservers.putIfAbsent(observer, wrapper);
        if (existing != null && !existing.isAttachedTo(owner)) {
            throw new IllegalArgumentException("Cannot add the same observer"
                    + " with different lifecycles");
        }
        if (existing != null) {
            return;
        }
        //感知lifecycle的生命周期变化
        owner.getLifecycle().addObserver(wrapper);
    }
- 1.
- 2.
- 3.
- 4.
- 5.
- 6.
- 7.
- 8.
- 9.
- 10.
- 11.
- 12.
- 13.
- 14.
- 15.
- 16.
- 17.
- 18.
- 19.
- 20.
- 21.
- 22.
- 23.
- 24.
- 25.
2、LifecycleBoundObserver
- LifecycleBoundObserver 继承 ObserverWrapper ,实现 LifecycleEventObserver 接口。
- ObserverWrapper 用于判断组件当前是否活跃;
- LifecycleEventObserver 就是 Lifecycle 的观察者了,重写了 onStateChanged 方法,当Lifecycle 生命周期发生变化时,就会在此方法接收到,LiveData 也就能感知到,如果组件的生命周期是 DESTROYED ,那也就移除观察;
- 到这里 LiveData 对组件的生命周期感知就注册完成了,可以开始发送数据;
class LifecycleBoundObserver extends ObserverWrapper implements LifecycleEventObserver {
        @NonNull
        //一般组件,比如Activity、fragment可以会实现LifecycleOwner ,可以拿到lifecycle
        final LifecycleOwner mOwner;
        LifecycleBoundObserver(@NonNull LifecycleOwner owner, Observer<? super T> observer) {
            super(observer);
            mOwner = owner;
        }
        /* 判断当前组件当前是否活跃 */
        @Override
        boolean shouldBeActive() {
            return mOwner.getLifecycle().getCurrentState().isAtLeast(STARTED);
        }
        @Override
        public void onStateChanged(@NonNull LifecycleOwner source,
                @NonNull Lifecycle.Event event) {
            //获取当前生命周期状态
            Lifecycle.State currentState = mOwner.getLifecycle().getCurrentState();
            //如果组件已销毁了,就移除观察
            if (currentState == DESTROYED) {
                removeObserver(mObserver);
                return;
            }
            Lifecycle.State prevState = null;
            while (prevState != currentState) {
                prevState = currentState;
                activeStateChanged(shouldBeActive());
                currentState = mOwner.getLifecycle().getCurrentState();
            }
        }
        /* 判断是否绑定 */
        @Override
        boolean isAttachedTo(LifecycleOwner owner) {
            return mOwner == owner;
        }
        /* 移除观察 */
        @Override
        void detachObserver() {
            mOwner.getLifecycle().removeObserver(this);
        }
    }
- 1.
- 2.
- 3.
- 4.
- 5.
- 6.
- 7.
- 8.
- 9.
- 10.
- 11.
- 12.
- 13.
- 14.
- 15.
- 16.
- 17.
- 18.
- 19.
- 20.
- 21.
- 22.
- 23.
- 24.
- 25.
- 26.
- 27.
- 28.
- 29.
- 30.
- 31.
- 32.
- 33.
- 34.
- 35.
- 36.
- 37.
- 38.
- 39.
- 40.
- 41.
3、activeStateChanged
ObserverWrapper 这个类里面有个方法,后面的粘性事件会用到;
void activeStateChanged(boolean newActive) {
            //组件状态如果不变返回
            if (newActive == mActive) {
                return;
            }
            // immediately set active state, so we'd never dispatch anything to inactive
            // owner
            mActive = newActive;
            changeActiveCounter(mActive ? 1 : -1);
            //如果是活动的就发送数据
            if (mActive) {
                dispatchingValue(this);
            }
        }
- 1.
- 2.
- 3.
- 4.
- 5.
- 6.
- 7.
- 8.
- 9.
- 10.
- 11.
- 12.
- 13.
- 14.
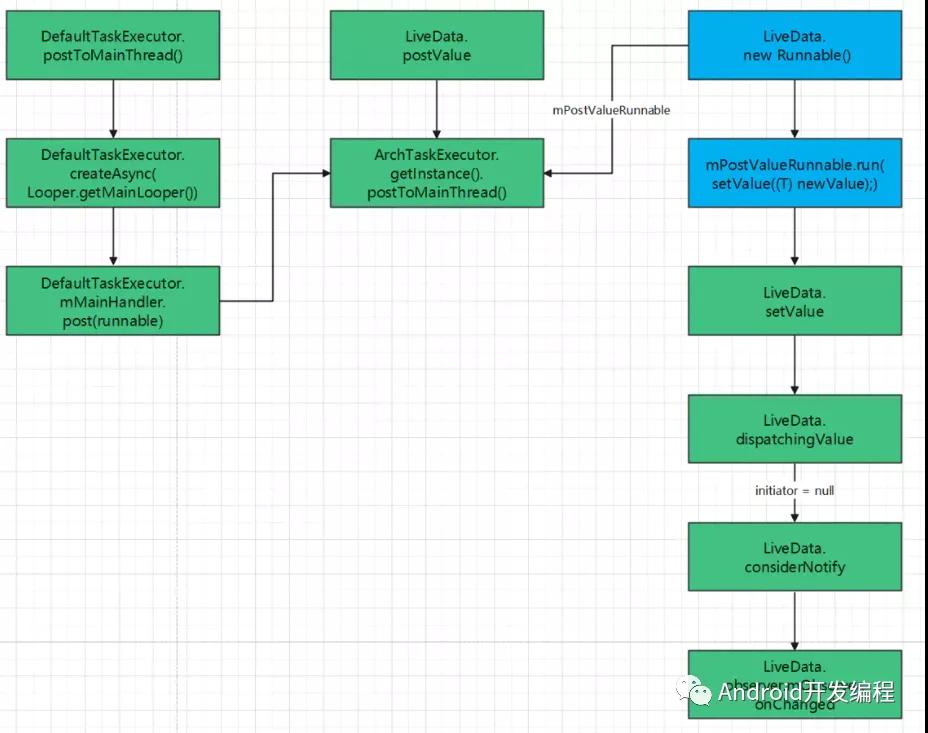
4、发送数据分析
4.1、postValue 发送数据到主线程
这个方法最核心的就是利用主线程Handler发送数据,一步步拆开分析;
protected void postValue(T value) {
        boolean postTask;
        //加锁
        synchronized (mDataLock) {
            postTask = mPendingData == NOT_SET;
            //保存要发送的数据value
            mPendingData = value;
        }
        if (!postTask) {
            return;
        }
        //利用主线程Handler发送
        ArchTaskExecutor.getInstance().postToMainThread(mPostValueRunnable);
    }
- 1.
- 2.
- 3.
- 4.
- 5.
- 6.
- 7.
- 8.
- 9.
- 10.
- 11.
- 12.
- 13.
- 14.
4.2、postValue 其实就是 setValue
在postValue 要发送的 Runnable ,可以看到最后一行就是 setValue 方法,数据也即是之前保存的mPendingData ,只是在这又给 newValue;
private final Runnable mPostValueRunnable = new Runnable() {
        @SuppressWarnings("unchecked")
        @Override
        public void run() {
            Object newValue;
            synchronized (mDataLock) {
                newValue = mPendingData;
                mPendingData = NOT_SET;
            }
            setValue((T) newValue);
        }
    };
- 1.
- 2.
- 3.
- 4.
- 5.
- 6.
- 7.
- 8.
- 9.
- 10.
- 11.
- 12.
4.3、postToMainThread 主线程Handler
ArchTaskExecutor 类 postToMainThread 方法,实际就是 DefaultTaskExecutor 类执行 postToMainThread 方法;
public class ArchTaskExecutor extends TaskExecutor {
    @NonNull
    private TaskExecutor mDelegate;
    @NonNull
    private TaskExecutor mDefaultTaskExecutor;
    private ArchTaskExecutor() {
        mDefaultTaskExecutor = new DefaultTaskExecutor();
        mDelegate = mDefaultTaskExecutor;
    }
    ...
    @Override
    public void postToMainThread(Runnable runnable) {
        mDelegate.postToMainThread(runnable);
    }
    ...
}
- 1.
- 2.
- 3.
- 4.
- 5.
- 6.
- 7.
- 8.
- 9.
- 10.
- 11.
- 12.
- 13.
- 14.
- 15.
- 16.
4.4、DefaultTaskExecutor类
我们知道是 DefaultTaskExecutor. postToMainThread,就直接看这个方法,哎呀,太熟悉的代码,创建 Handler ,传入的是 Looper.getMainLooper() ,就是主线程Handler ,然后就 post 消息;
public class DefaultTaskExecutor extends TaskExecutor {
    @Nullable
    private volatile Handler mMainHandler;
    @Override
    public void postToMainThread(Runnable runnable) {
        if (mMainHandler == null) {
            synchronized (mLock) {
                if (mMainHandler == null) {
                    mMainHandler = createAsync(Looper.getMainLooper());
                }
            }
        }
        //noinspection ConstantConditions
        mMainHandler.post(runnable);
    }
}
- 1.
- 2.
- 3.
- 4.
- 5.
- 6.
- 7.
- 8.
- 9.
- 10.
- 11.
- 12.
- 13.
- 14.
- 15.
- 16.
4.5、setValue 方法
mVersion 在初始化的构造方法里就赋值了,为-1,每次setValue,版本号就会变一次;
setValue 也就是用 mData 保存一下 value ,然后交给 dispatchingValue 方法处理;
@MainThread
    protected void setValue(T value) {
        assertMainThread("setValue");
        mVersion++;
        mData = value;
        dispatchingValue(null);
    }
- 1.
- 2.
- 3.
- 4.
- 5.
- 6.
- 7.
4.6、dispatchingValue 方法
setValue走该方法,传的 initiator为空,那就遍历 mObservers 保存的观察者发送数据;
@SuppressWarnings("WeakerAccess") /* synthetic access */
    void dispatchingValue(@Nullable ObserverWrapper initiator) {
        if (mDispatchingValue) {
            mDispatchInvalidated = true;
            return;
        }
        mDispatchingValue = true;
        do {
            mDispatchInvalidated = false;
            if (initiator != null) {
                //粘性事件,就单个观察者接受数据
                considerNotify(initiator);
                initiator = null;
            } else {
                //setvalue 传过来 initiator 为空,执行这里
                // mObservers 拿出来,逐个发送数据
                for (Iterator<Map.Entry<Observer<? super T>, ObserverWrapper>> iterator =
                        mObservers.iteratorWithAdditions(); iterator.hasNext(); ) {
                    considerNotify(iterator.next().getValue());
                    if (mDispatchInvalidated) {
                        break;
                    }
                }
            }
        } while (mDispatchInvalidated);
        mDispatchingValue = false;
    }
- 1.
- 2.
- 3.
- 4.
- 5.
- 6.
- 7.
- 8.
- 9.
- 10.
- 11.
- 12.
- 13.
- 14.
- 15.
- 16.
- 17.
- 18.
- 19.
- 20.
- 21.
- 22.
- 23.
- 24.
- 25.
- 26.
- 27.
4.7、considerNotify 判断发送数据
- 这里先判断组件是否活动
- 在判断粘性事件
- 然后用 mVersion ,判断是否发送过数据
- 最后才是给观察者发送数据
private void considerNotify(ObserverWrapper observer) {
        //组件是否活动
        if (!observer.mActive) {
            return;
        }
        // Check latest state b4 dispatch. Maybe it changed state but we didn't get the event yet.
        //
        // we still first check observer.active to keep it as the entrance for events. So even if
        // the observer moved to an active state, if we've not received that event, we better not
        // notify for a more predictable notification order.
        //判断粘性事件
        if (!observer.shouldBeActive()) {
            observer.activeStateChanged(false);
            return;
        }
        //校验是否发送过数据
        if (observer.mLastVersion >= mVersion) {
            return;
        }
        observer.mLastVersion = mVersion;
        //发送数据
        observer.mObserver.onChanged((T) mData);
    }
- 1.
- 2.
- 3.
- 4.
- 5.
- 6.
- 7.
- 8.
- 9.
- 10.
- 11.
- 12.
- 13.
- 14.
- 15.
- 16.
- 17.
- 18.
- 19.
- 20.
- 21.
- 22.
- 23.
5、粘性事件分析
- 粘性事件就是先发送数据,后面再注册观察者,还能收到消息;
- 我们就从LiveData.observe 开始,新的页面注册LiveData观察者,也注册Lifecycle观察;
- 当新页面生命周期变化,就会执行 LifecycleBoundObserver.onStateChanged 的方法;
- 接下来 activeStateChanged 方法,因为是新页面,组件状态是活动的,就走到 dispatchingValue 方法;
- dispatchingValue 传进来当前新页面的 initiator 是不为空的,就只会给当前观察者发送数据;
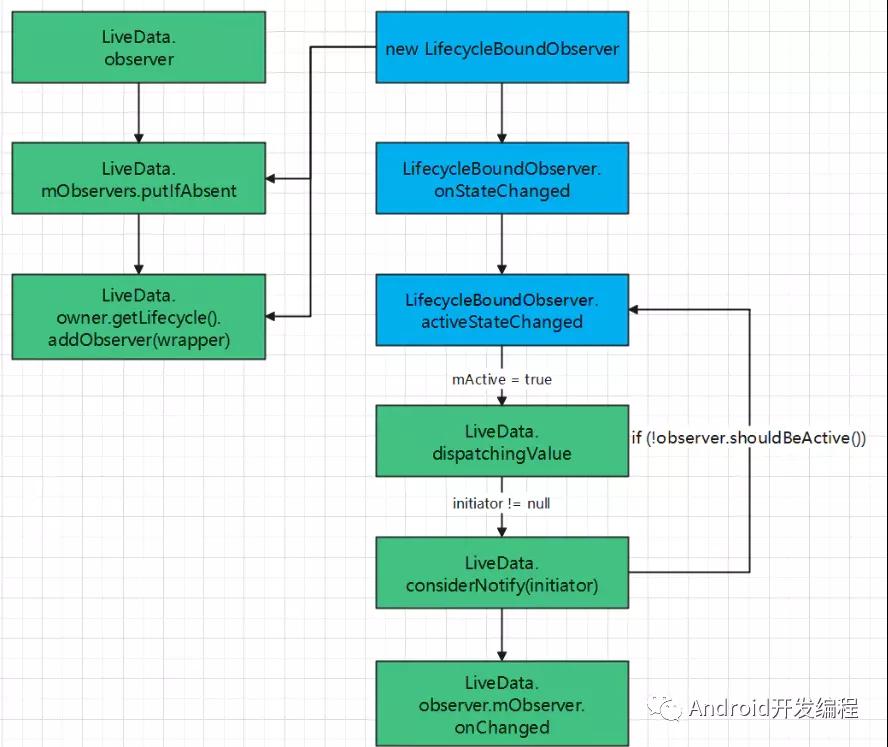
总结:
1、LifecycleOwner生命周期从非活跃变成活跃状态时:
Livedata添加一个观察者时,会关联一个LifecycleOwner,然后把这个观察者包装成一个LifecycleBoundObserver,和LifecycleOwner的getLifecycle关联,当LifecycleBoundObserver的生命周期变化时,会调用LifecycleBoundObserver的onStateChanged方法,在这个方法中判断当前生命周期和上次的生命周期是否是同一类型(要么活跃要么非活跃),如果是,就直接返回,避免重复通知(start通知了,resume就不需要通知了),如果不是同一类型,并且当前生命周期是活跃状态,就调用dispatchingValue方法通知观察者,判断LifecycleOwner是否时活跃状态,如果是,将Livedata中持有的最新更新给观察者;
2、Livedata中的值改变时:
同样是调用dispatchingValue,判断LifecycleOwner是否时活跃状态,如果是,就遍历通知所有观察者;