路由Next.js 想必大家不陌生吧,其中最为熟知的就是约定式路由(基于文件系统)。现在我们来在Vite 中巧妙地实现这一项省心的功能。
本文是以 React 结合 React-Router 实现,vue的实现思路基本一致,只有后缀名和 vue-router的差别,需要的可以照搬此方案。
路由形式
首先看看 Next.js 基于文件约定式路由长什么样。Next.js将文件添加到 pages 目录时,它会自动生成对应的路由。在开发时省去了很多模板代码,提升开发效率。
特性一:它将 index 文件名 js|jsx|ts|tsx 结尾的文件,映射成当前目录的根路由:
- pages/index.js → /
- pages/blog/index.js → /blog
特性二:支持嵌套目录文件。如果创建嵌套文件夹结构,文件将自动以相同的方式生成路由:
- pages/about.js → /about
- pages/blog/first-post.js → /blog/first-post
- pages/dashboard/settings/username.js → /dashboard/settings/username
特性三:使用括号语法。匹配动态命名参数:
- pages/blog/[slug].js → /blog/:slug( /blog/hello-world)
- pages/[username]/settings.js → /:username/settings( /foo/settings)
这种路由方式看起来非常清晰,创建一个路由就如同写组件一样简单。umijs 也支持约定式路由,形式基本一致,用过的想必也因此受益。然而 Vite作为一个脚手架提供更加通用的功能以支持 vue和 react,自然不会耦合这种路由方案。
启发
在 Vite 官方文档中 https://cn.vitejs.dev/guide/features.html#glob-import Glob 导入是这样介绍的:
Vite 支持使用特殊的 import.meta.glob 函数从文件系统导入多个模块:
const modules = import.meta.glob('./dir/*.js');- 1.
以上将会被转译为下面的样子:
const modules = {
  './dir/foo.js': () => import('./dir/foo.js'),
  './dir/bar.js': () => import('./dir/bar.js'),
};- 1.
- 2.
- 3.
- 4.
这个 API 就类似 Webpack 的require.context()。Nice. 可以来个大胆的想法,用 React.lazy 结合 React-Router v6 做个文件约定式路由。说做就做!我们需要做的事情只有一件,那就是将这个从文件读取出来的 JSON 转换为 React-Router 配置。
先看一下 React-Router v6 的结构长这样:
<Routes>
  <Route path="/" element={<App />}>
    <Route index element={<Home />} />
    <Route path="teams" element={<Teams />}>
      <Route index element={<LeagueStandings />} />
      <Route path=":teamId" element={<Team />} />
      <Route path="new" element={<NewTeamForm />} />
    </Route>
  </Route>
</Routes>- 1.
- 2.
- 3.
- 4.
- 5.
- 6.
- 7.
- 8.
- 9.
- 10.
还有个 useRoutes 以 JSON 的形式来配置路由:
const routes = [
  {
    element: <App />,
    path: '/',
    children: [
      {
        index: true,
        element: <Home />,
      },
      {
        path: 'teams',
        element: <Teams />,
        children: [
          {
            index: true,
            element: <LeagueStandings />,
          },
          {
            path: ':teamId',
            element: <Team />,
          },
          {
            path: 'new',
            element: <NewTeamForm />,
          },
        ],
      },
    ],
  },
];

// 导出路由组件
export function PageRoutes() {
  return useRoutes(routes);
}- 1.
- 2.
- 3.
- 4.
- 5.
- 6.
- 7.
- 8.
- 9.
- 10.
- 11.
- 12.
- 13.
- 14.
- 15.
- 16.
- 17.
- 18.
- 19.
- 20.
- 21.
- 22.
- 23.
- 24.
- 25.
- 26.
- 27.
- 28.
- 29.
- 30.
- 31.
- 32.
- 33.
- 34.
- 35.
这样只需要转换成以上 JSON 结构就可以了。
路由规则
生成的方式,我们尽量与 next.js 保持一致, 并实现 umijs 形式的约定式 layout。但避免一个问题:避免将不需要的组件映射成路由。这点 next.js 必须将非路由相关的文件放到 pages 目录之外。而 umijs 的排除规则是这样的:
- 以 . 或 _ 开头的文件或目录
- 以 d.ts 结尾的类型定义文件
- 以 test.ts、spec.ts、e2e.ts 结尾的测试文件(适用于 .js、.jsx 和 .tsx 文件)
- components 和 component 目录
- utils 和 util 目录
- 不是 .js、.jsx、.ts 或 .tsx 文件
- 文件内容不包含 JSX 元素
这点 umijs 确实做得有点复杂多余了,一大堆规则很容易让开发者晕头转向。在组件化的项目中,路由文件很多情况下会远少于页面组件。我们可以使用某种特殊标识,标明它是一个路由:
我们暂定 $ 开头的文件作为路由生成的规则
- pages/$index.tsx → /
- pages/blog/$index.tsx → /blog
- pages/$about.tsx → /about
- pages/blog/$[foo].tsx → /blog/:foo( /blog/hello-world)
用 $.tsx 作为 layout 而不是 umijs 中的 _layout.tsx。
在 fast-glob https://github.com/mrmlnc/fast-glob#pattern-syntax 详细文档中支持更多用法,我们则需要读取 pages 目录下的所有 ts、tsx 文件,通配符可以这样写:
const modules = import.meta.glob('/src/pages/**/$*.{ts,tsx}');- 1.
我们有这样一个目录
├─pages
│  │  $.tsx
│  │  $index.tsx
│  │
│  └─demo
│      │  $index.tsx
│      │
│      └─demo-child
│              $hello-world.tsx
│              $index.tsx
│              $[name].tsx
- 1.
- 2.
- 3.
- 4.
- 5.
- 6.
- 7.
- 8.
- 9.
- 10.
- 11.
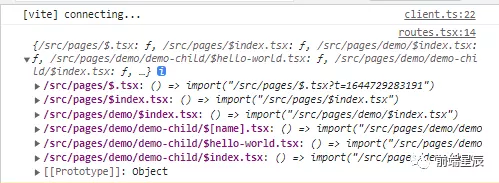
打印 modules 结果如下:
实现
我们可以先将 modules 变量转换为嵌套结构的 JSON 便于理解(先忽略 $.tsx):
import { set } from 'lodash-es';

/**
 * 根据 pages 目录生成路径配置
 */
function generatePathConfig(): Record<string, any> {
  // 扫描 src/pages 下的所有具有路由文件
  const modules = import.meta.glob('/src/pages/**/$*.{ts,tsx}');

  const pathConfig = {};
  Object.keys(modules).forEach((filePath) => {
    const routePath = filePath
      // 去除 src/pages 不相关的字符
      .replace('/src/pages/', '')
      // 去除文件名后缀
      .replace(/.tsx?/, '')
      // 转换动态路由 $[foo].tsx => :foo
      .replace(/\$\[([\w-]+)]/, ':$1')
      // 转换以 $ 开头的文件
      .replace(/\$([\w-]+)/, '$1')
      // 以目录分隔
      .split('/');
    // 使用 lodash.set 合并为一个对象
    set(pathConfig, routePath, modules[filePath]);
  });
  return pathConfig;
}- 1.
- 2.
- 3.
- 4.
- 5.
- 6.
- 7.
- 8.
- 9.
- 10.
- 11.
- 12.
- 13.
- 14.
- 15.
- 16.
- 17.
- 18.
- 19.
- 20.
- 21.
- 22.
- 23.
- 24.
- 25.
- 26.
- 27.
打印的 generatePathConfig() 目录结构结果如下:

现在已经很接近 React-Router 的配置了。
我们只需要将 import() 语法稍微封装一下 () => import('./demo/index.tsx') 基础上包一层 React.lazy 将其转换为组件:
/**
 * 为动态 import 包裹 lazy 和 Suspense
 */
function wrapSuspense(importer: () => Promise<{ default: ComponentType }>) {
  if (!importer) {
    return undefined;
  }
  // 使用 React.lazy 包裹 () => import() 语法
  const Component = lazy(importer);
  // 结合 Suspense,这里可以自定义 loading 组件
  return (
    <Suspense fallback={null}>
      <Component />
    </Suspense>
  );
}- 1.
- 2.
- 3.
- 4.
- 5.
- 6.
- 7.
- 8.
- 9.
- 10.
- 11.
- 12.
- 13.
- 14.
- 15.
- 16.
我们将 pathConfig 递归将其转换为 React-Router 的配置
/**
 * 将文件路径配置映射为 react-router 路由
 */
function mapPathConfigToRoute(cfg: Record<string, any>): RouteObject[] {
  // route 的子节点为数组
  return Object.entries(cfg).map(([routePath, child]) => {
    // () => import() 语法判断
    if (typeof child === 'function') {
      // 等于 index 则映射为当前根路由
      const isIndex = routePath === 'index';
      return {
        index: isIndex,
        path: isIndex ? undefined : routePath,
        // 转换为组件
        element: wrapSuspense(child),
      };
    }
    // 否则为目录,则查找下一层级
    const { $, ...rest } = child;
    return {
      path: routePath,
      // layout 处理
      element: wrapSuspense($),
      // 递归 children
      children: mapPathConfigToRoute(rest),
    };
  });
}- 1.
- 2.
- 3.
- 4.
- 5.
- 6.
- 7.
- 8.
- 9.
- 10.
- 11.
- 12.
- 13.
- 14.
- 15.
- 16.
- 17.
- 18.
- 19.
- 20.
- 21.
- 22.
- 23.
- 24.
- 25.
- 26.
- 27.
- 28.
最后组装这个配置:
function generateRouteConfig(): RouteObject[] {
  const { $, ...pathConfig } = generatePathConfig();
  // 提取跟路由的 layout
  return [
    {
      path: '/',
      element: wrapSuspense($),
      children: mapPathConfigToRoute(pathConfig),
    },
  ];
}

const routeConfig = generateRouteConfig();- 1.
- 2.
- 3.
- 4.
- 5.
- 6.
- 7.
- 8.
- 9.
- 10.
- 11.
- 12.
- 13.
打印这个 routeConfig 配置试试:

最后将封装的组件插入到 App 中
export function PageRoutes() {
  return useRoutes(routeConfig);
}- 1.
- 2.
- 3.
至于为什么要将 PageRoutes 单独做成个组件,因为 useRoutes 需要 BrowserRouter 的 Context,否则会报错。
function App() {
  return (
    <BrowserRouter>
      <PageRoutes />
    </BrowserRouter>
  );
}- 1.
- 2.
- 3.
- 4.
- 5.
- 6.
- 7.
大功告成!预览一下:

结语
想起几年前写 React-Router v2 配置 JSON 的痛苦经历历历在目。现在有了基于文件式路由用法,在Vite 上面也能愉快地早点下班了。